

Woman Behind the Chair Featuring: Mandi from Vintage Revivals
Whenever my phone buzzes and I see that I have a text from Mandi at Vintage Revivals I know that something crazy and innovative is about to be added to my schedule and that I will jump at whatever it is that she is about to ask. So in the fall of 2019 Mandi texted me and asked if I was interested in helping her build a couch, (which if you know me at all,) the answer was an immediate YES!

Images Owned & Provided By Vintage Revivals
She was working on a outdoor patio project with SUNBRELLA FABRICS and they had asked her to showcase their outdoor fabrics in her upcoming furniture build. She had a solid design for the couch and had already started building the frame. She needed help figuring out how to create the cushions to fit the shape and look of the frame as well as help sewing the cushion covers for them out of the Sunbrella Fabric.
So the upholstery part of the couch build is where I came in. We got together and had a quick planning session. I sketched a few things out and it came together relatively quickly because Mandi knew what she wanted the cushions to look like, but just wasn't sure how to fabricate the cushions to and sew the upholstered covers.
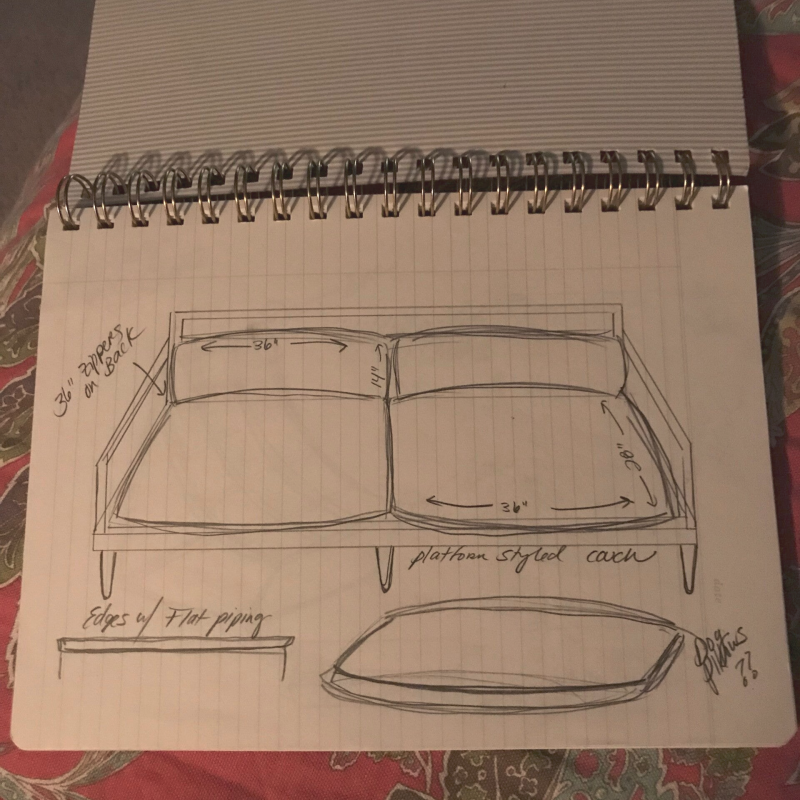
Mandi wanted the cushions to have and overstuffed-pillow look to them, (so no side banding like traditional sofa cushions,) and was thinking that we could maybe use oversized dog pillows as the inserts. Which honestly is a great idea, but the only drawback is that a lot of reasonably priced pet pillows are filled with a batting like stuffing and will tend to get lumpy over time, and the ones that are more supportive can get really expensive.
SO I came up with a budget friend way we would combine upholstery foam , batting and feather elements into ONE insert that we could then sew custom cushion covers for out of the SUNBRELLA Fabric. We had our plan of attack and got all the supplies ordered.
Mandi got to work on building the frame for the couch and she has a whole blog post titled DIY Platform Couch Tutorial if you want to check it out! She covers everything from materials, measurements and of course all the instructions for building the couch frame.
Building the Custom Cushion Inserts
Once all of the materials arrived I got to work on fabricating the custom cushion inserts.
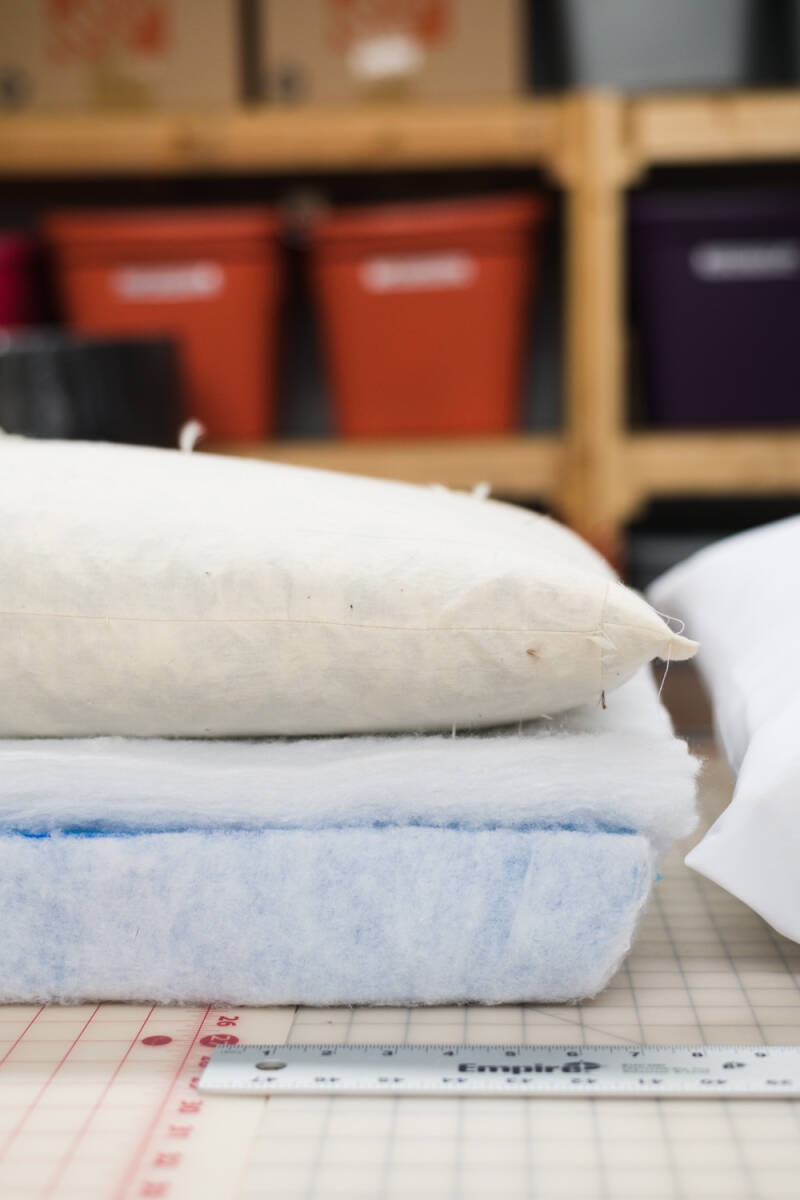
My plan was to create each cushion out of 3 separate layers:
Dense Foam wrapped in a Low Loft Batting - as the base/support layer
High Loft Batting or Dacron - stacked on top of the dense foam.
Feather Filled Insert - as a topper that would give cushion its cloud like structure
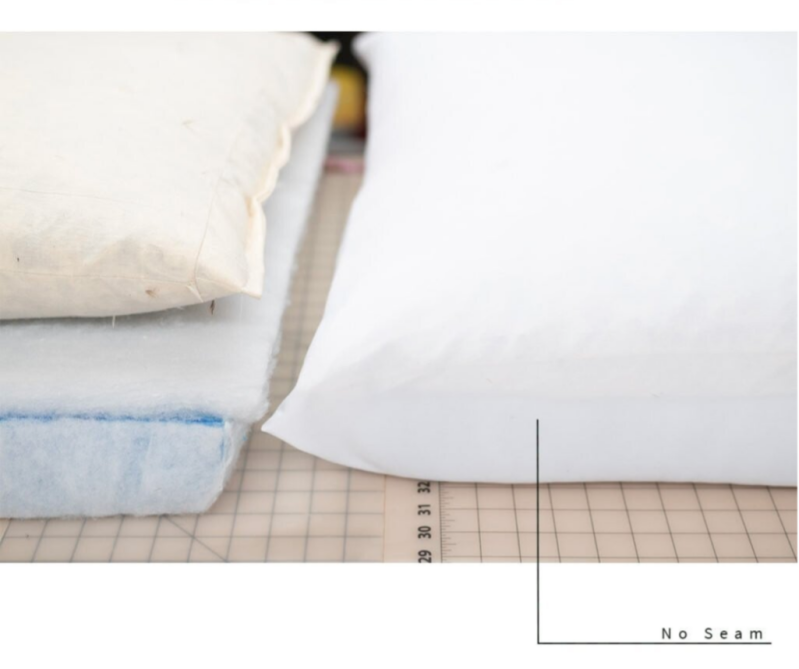
Those THREE layers would be cut to size, wrapped, sewn & stacked then be inserted into a cushion cover made from lightweight muslin or cotton. Taking the three separate elements and turning them into one custom sofa cushion.
Base Layer: Upholstery Foam
Knowing that I would need to shape the foam a bit to give it that "pillow shape" -
I marked the final size of the foam then added 1' to each side.
This would allow me to bevel the bottom edge without loosing the overall width we wanted. I used a serrated bread knife to cut a beveled edge all the way around the foam cushion.
once both cushions were cut, I wrapped the foam in a low-loft upholstery batting (you can find it online or at local fabric stores) this helps soften the edges of the foam. I used a high tack spray adhesive to attach the batting to the foam. I will share links to the supplies I used at the bottom of this post.
Why Bother with a Down Filled Top Cushion?
This step might seem super extra, but if you look at a lot of high-end furniture makers you will see that sometimes they offer "down-topped" cushions or "down wrapped" cushions and its not a cheap upgrade.
Having a thick layer of down on top of the supportive cushion will give this couch a welcoming cloud-like comfy feel with the added support of a traditional sofa, and that is hard to beat.
Making the down filled top cushion was very easy. I essentially created a pillowcase that was the size of the top of the foam cushion. Filled the cover almost halfway full of feathers then carefully sewed the open end ALMOST closed, maybe leaving just enough space to get my hand in there. Then came the messy part of shoving hand full after handful of pillow down into the "pillow case" until it was filled to our desired fullness. I then stitched the last 4 inches closed and there you have it... down-filled couch cushion topper! Last thing I did before moving on to the next down cushion was to weigh it. I wanted the fullness of the sets of pillows to match and that seemed the most logical way to make sure they did.
Why not just order down topped cushions online? Quick answer... because I'm cheap.
When Mandi first called me I actually went online to a few distributors that I am familiar with and priced out a couple different options for the cushion inserts.
It would have been a very easy way to do this build but the prices were more Champagne and we were looking for more of an Apple Juice option.
I even looked into ordering just the down-filling for pillows and bedding from an upholstery supplier and even ordering just those can get expensive.
Good news is, I have a cheap and easy hack for that!!
I like to keep an eye on the clearance aisles at places like TJMAXX, HOMEGOODS, MARSHALLS etc because they always have too many throw pillows for sale, which means they always have ugly throw pillows on clearance ha! I will let you in on a little secret.... the feathers inside of a cute full priced pillow are just the same as the feathers inside a clearance priced pillow. So we grabbed several clearance price pillows and used their guts to make the cushion toppers for the large seat cushions, and full feather inserts for upper back cushions, like Mandi says "easy-peasy"

Making the Cushion Covers:
With the lower and upper cushion inserts built I was ready to move onto making the final covers out of the beautiful outdoor fabric from SUNBRELLA. Making the Cushion Covers
These were definitely some of the easier cushion covers I've ever made. Each cover consists of 3 parts, well I guess 4 if you want to get super technical.
One Top piece of fabric 42"x30"
Two Bottom pieces of fabric 42"x16"
One Zipper Flap 42"x2"
& One Coat Zipper 44"t

I created the bottom piece of the upper and lower cushion covers in 3 east steps.
1. folded the 2"x42" in half creating a flap and sewed it to one edge of one of the 42"x16" pieces of fabric.
2. With the zipper facing up I lined up the right edge of the zipper with the wrong side of the fabric edge (edge to edge) and sewed them to each other. Once they were sewn I fold the fabric back and lightly ironed the seam flat
3. With the zipper facing up I lined the fabric seam (where the fabric and flap meet0 to the left edge of the zipper and top stiched all the way down, sewing the left edge of the zipper to the left edge of the fabric.
Once I was finished sewing I had a 42"x30" piece of fabric with a full zipper down the middle hidden under a flap of fabric.... leave the zipper open half way for this next part.
Then all I had to do to attach the top and bottom pieces to each other was to line up the TWO pieces of fabric with the WRONG sides together and sew all the way around the outside of the cover. Flipped the rights sides out, through the open zipper and lightly iron the edges flat.
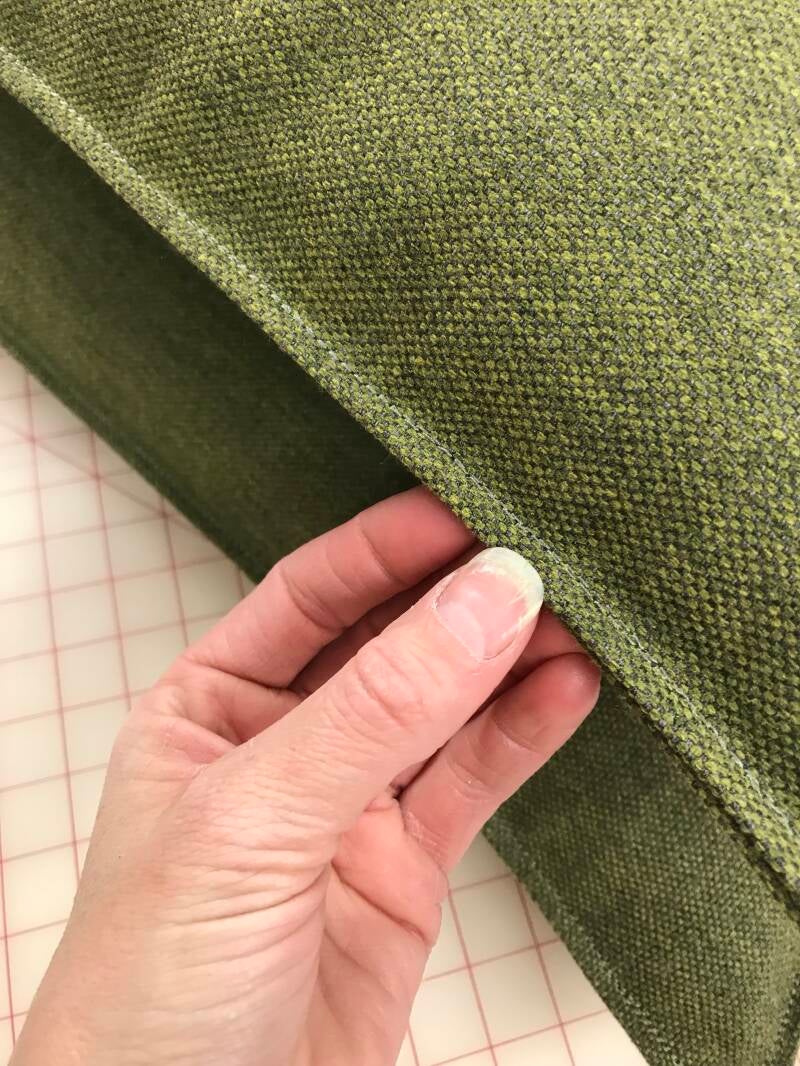

To Make the Edge Detail
Creating this flat edged detail was so easy but made a huge impact on the overall effect.
Once the covers were flipped right side out and lightly ironed I set up my machine with a coordinating thread , set my magnetic guide at 1/4" and top-stitched all the way around each cushion cover. it took barely any time but I love the look and custom finish it gave the couch cushions.

Signed, Sealed, Delivered...
With the cushions and covers all finished the Upholstery part of this build was ready to be delivered back to Mandi & Court at their amazing house loving called the MERC.
I have known Mandi & Court for a long time, and have loved just being a fly on the wall, sitting back and watching their story unfold. Im always speechless when I see small glimpses into their progress as they complete every stressful step of turning a run down old Mercantile into a truly unique and architecturally breathtaking home! I'm not even going to bother taking "after" pictures of this project because I know that the ones Mandi will take will blow everything else out of the water.
Check out a few of the couch pictures that she shared below, and then follow the link below to see more about what they are up to this week!!
This was a Collaboration with Vintage Revivals
Mandi has two BLOG Posts titled DIY Platform Couch Tutorial and DIY Couch Build Part 2 - Upholstery Hacks from a Pro where she breaks down the details of how she built the platform couch frame, materials needed, detailed measurements and step by step instructions for both parts of her couch build.
They are definitely worth a read, so check them out and then come back here for little more in-depth into the upholstery/sewing process.


Supplies and Links
Upholstery Foam - https://www.homedepot.com/p/Camping-Foam-Carpet-Pad-10030CAMP-PAD/203243566
Upholstery Foam - https://a.co/d/c51jDqn
Low Loft Batting - https://a.co/d/2sAsOG8
High Loft Batting or Dacron - https://a.co/d/5tIvd3U
Cotton Muslin - https://a.co/d/9f13Sdf
High Tack Spray Adhesive - https://a.co/d/1cCoKTF
Upholstery Zippers - https://a.co/d/g9JlM24
Outdoor Fabric Sealer- https://a.co/d/249EJTf
Heavy Duty Sewing Machine Needles - https://a.co/d/aSW6YR5
Upholstery Grade Thread - https://a.co/d/hDFOL2j
Sunbrella Outdoor Fabrics - https://www.sunbrella.com/browse-fabrics
Check out the Madam of Making Amazon Storefront for MORE helpful Upholstery & Sewing Supplies!
note: the majority of these are affiliate links which means that if you decide to purchase any of the items listed there is a chance I will make a little bit of money. There is no additional cost to you, if comes from amazon for promoting items on their website. Affiliate links help keep me in business in help keep my content free for my community.
Add comment
Comments